|
|
You are here: Foswiki>Support Web>VirtualMachineImages>HowToRunVirtualMachineImageOnVirtualBox (16 Feb 2017, LynnwoodBrown)Edit Attach
How to run Virtual Machine Image on VirtualBox
Quick instructions if you know how to use VirtualBox:- Create a new VirtualBox virtual machine of type Linux/Debian, using the existing image you downloaded (the
.vmdkone) - For the network, either use "NAT" and configure port forwarding, or use "Host Interface" (see below).
- Run the newly created VM.
Installation
Download VirtualBox and install it through the graphical installer. This should be very easy.Adding the VM image
- Download the virtual machine image (in either .tar.bz2, .tar.gz, or .zip archive format).
- Uncompress the archive and locate the
vmdkfile within.
Adding the Virtual Machine
 |
Create a new virtual machine named "foswiki" (you can choose any name of course), of type Linux, kind Debian |
 |
Click on the "Existing..." button to make it use an existing image |
 |
Select the foswiki-vm.vmdk you extracted from the archive (you will have to click the "Add" button to add it to your list of available images first) |
 |
Your VM is now ready, click "Finish" |
 |
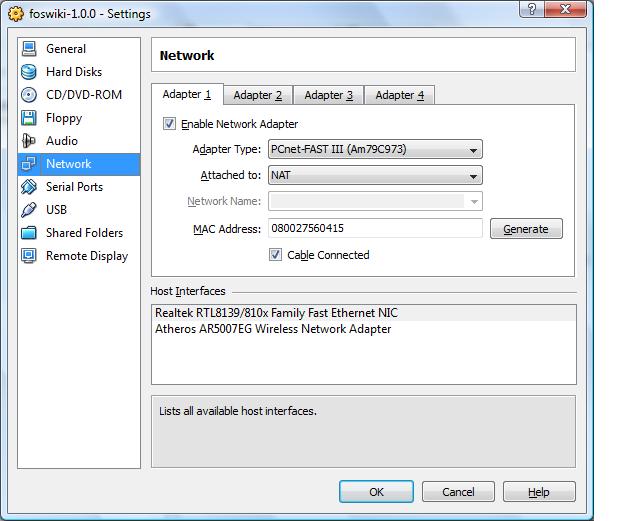
And is ready to start. You can see that by default we are in "Option 1: NAT" in the "Network" field at the bottom right |
Option 1: NAT + Port-forwarding (default)
By default, the network interface is set to use NAT. To activate port-forwarding (so you can access the virtual machine from your browser), follow these steps:  |
In the VirtualBox manager, select your Foswiki VM and click the "Settings" (yellow gear) button. Then select the "Network" tab and expand "Advanced" settings. Then click "Port Forwarding" (see red arrow in screenshot). |
 |
In the "Port Forwarding" dialog, click the green "+" button at right to add a new rule. Enter the values in the image at left. (E.g. Protocol = TCP, HostPort = 8888, & GuestPort = 80.) Click "OK" to close dialog and then "OK" again to save Network settings. |
cd to the directory containing VBoxManage and execute the command there.)
VBoxManage setextradata "foswiki-1.0" "VBoxInternal/Devices/pcnet/0/LUN#0/Config/foswiki/Protocol" TCP
VBoxManage setextradata "foswiki-1.0" "VBoxInternal/Devices/pcnet/0/LUN#0/Config/foswiki/GuestPort" 80
VBoxManage setextradata "foswiki-1.0" "VBoxInternal/Devices/pcnet/0/LUN#0/Config/foswiki/HostPort" 8888
(Here, "foswiki" is the name you gave your VM, and 8888 is the port you want to use on your host.)
It should look like this:
 Now enter
 http://localhost:8888 in your browser after you see the login prompt in your VM.
Option 2: Host Interface
 |
Click the blue "Network" at the bottom right to setup the network to use "Host Interface" |
 |
Start the VM. In its console, log as foswiki (password is foswiki, attention : english qwerty keymap). Gain root access by "sudo su -" and type ifconfig. The first listed "inet addr" under an eth (eth0 normally) entry is the IP address of your foswiki server (in the screenshot it is 10.0.0.62 but will depend on your network). |
 |
Use this IP address in your browser to browse your foswiki server (in the screenshot it means going to http://10.0.0.62) |
Troubleshooting
- The system blocks with a message "Waiting for root file system"
- Try to declare the virtual emulated disk as a
SATA Port 0(this should not be needed normally)
- Try to declare the virtual emulated disk as a
- The server do not respond
- Log in the VM console (user:
foswiki, password:foswiki, attention : english qwerty keymap), type:
/bin/echo "" >/etc/udev/rules.d/z25_persistent-net.rules
and restart the VM. This is in case you changed many times the network options and the eth number changed too much.
- Log in the VM console (user:
- If you get the error *"Failed to open/create the internal network" . Do the following steps
- Edit the machine, go to the network tab
- Check that the Attached To is set to NAT


| I | Attachment | Action | Size | Date | Who | Comment |
|---|---|---|---|---|---|---|
| |
network_settings_VISTA.jpg | manage | 50 K | 06 Jan 2009 - 23:26 | PeterVanHoof |
Edit | Attach | Print version | History: r22 < r21 < r20 < r19 | Backlinks | View wiki text | Edit wiki text | More topic actions
Topic revision: r22 - 16 Feb 2017, LynnwoodBrown
The copyright of the content on this website is held by the contributing authors, except where stated elsewhere. See Copyright Statement.  Legal Imprint Privacy Policy
Legal Imprint Privacy Policy